In this series of articles we will configure nginx for getting the highest score from SSLLabs. We are going to use free certificates provided by trusted CA LetsEncrypt. And what is even more fun, we will make it automatically renewable every month.
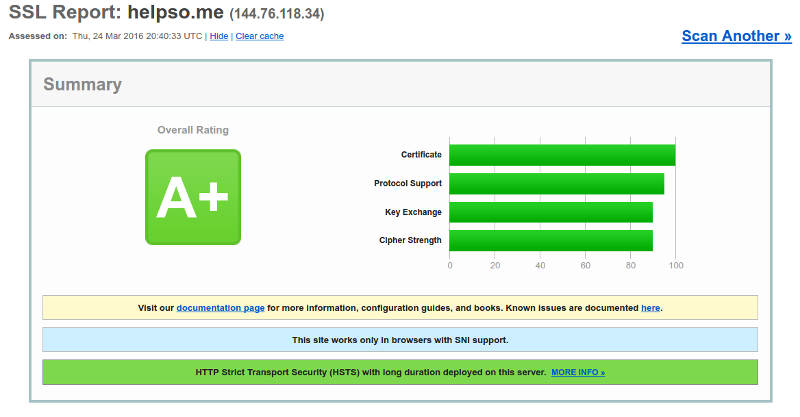
After configuration is finished it should look like this:
I am assuming that you already obtained your certificate and have necessary files, otherwise you might need to use the next part of this HOWTO to get a signed certificate from Let’s Encrypt.
So, let’s get started. First of all, check if your nginx supports TLS:
sudo nginx -V
Mine does:
TLS SNI support enabled
Next, we need to generate a new Ephemeral Diffie-Hellman prime:
sudo openssl dhparam -out /etc/pki/tls/private/dhparam.pem 4096
This could take some minutes even on a modern CPU, so be patient. Let’s change global nginx configuration:
sudo vim /etc/nginx/nginx.conf
Find http section and set:
ssl_dhparam /etc/pki/tls/private/dhparam.pem;
# shared cache, 10 Mb (1 Mb can store about 4000 sessions)
ssl_session_cache shared:SSL:10m;
# cache session parameters for 60 minutes
ssl_session_timeout 60m;
Important: if you have multiple servers configured on the same instance of nginx, SSL caching has to be turned on for all of them. The easiest way to reach this is changing global http section.
Now let’s change server configuration. Create a new server section and add these lines:
server {
    listen 443;
    # naturally, you should change server_name to your real server name
    server_name helpso.me www.helpso.me;

    ssl on;
    ssl_prefer_server_ciphers on;
    ssl_protocols TLSv1 TLSv1.1 TLSv1.2;
    ssl_ciphers "ECDH+AESGCM DH+AESGCM ECDH+AES256 DH+AES256 ECDH+AES128 DH+AES ECDH+3DES DH+3DES RSA+AESGCM RSA+AES RSA+3DES !aNULL !MD5 !DSS";

    # and provide full path to your certificate
    ssl_certificate /etc/letsencrypt/live/helpso.me/fullchain.pem;
    ssl_certificate_key /etc/letsencrypt/live/helpso.me/privkey.pem;

    # also, switch on HSTS (strict transport security) for 6 months
    add_header Strict-Transport-Security "max-age=15768000";

    ...
}
CAUTION: If you enable HSTS, there is no way back. Every browser that visited your page will remember that you do not want plain HTTP to be ever used for your server. That implies that you will have to have HTTPS on this domain, or your client wouldn’t be able to use your website.
If you want to use HSTS for all of your subdomains you can make it even more strict:
add_header Strict-Transport-Security "max-age=15768000;includeSubDomains";
Save your configuration and check if it is valid:
# sudo nginx -t
nginx: the configuration file /etc/nginx/nginx.conf syntax is ok
nginx: configuration file /etc/nginx/nginx.conf test is successful
Great! Now, if everything was configured correctly, you can reload configuration and start enjoying your A+ security:
sudo service nginx reload